
It can take weeks to train a neural network on large datasets. Luckily, this time can be shortened thanks to model weights from pre-trained models – in other words, applying transfer learning.
Transfer learning is a technique that works in image classification tasks and natural language processing tasks. In this article, you’ll dive into:
- what transfer learning is,
- how to implement transfer learning (in Keras),
- transfer learning for image classification,
- transfer learning for natural language processing
Well then, let’s start learning! (no pun intended… ok, maybe a little)
What is transfer learning?
Transfer learning is about leveraging feature representations from a pre-trained model, so you don’t have to train a new model from scratch.
The pre-trained models are usually trained on massive datasets that are a standard benchmark in the computer vision frontier. The weights obtained from the models can be reused in other computer vision tasks.
These models can be used directly in making predictions on new tasks or integrated into the process of training a new model. Including the pre-trained models in a new model leads to lower training time and lower generalization error.
Transfer learning is particularly very useful when you have a small training dataset. In this case, you can, for example, use the weights from the pre-trained models to initialize the weights of the new model. As you will see later, transfer learning can also be applied to natural language processing problems.

The advantage of pre-trained models is that they are generic enough for use in other real-world applications. For example:
- models trained on the ImageNet can be used in real-world image classification problems. This is because the dataset contains over 1000 classes. Let’s say you are an insect researcher. You can use these models and fine-tune them to classify insects.
- classifying text requires knowledge of word representations in some vector space. You can train vector representations yourself. The challenge here is that you might not have enough data to train the embeddings. Furthermore, training will take a long time. In this case, you can use a pre-trained word embedding like GloVe to hasten your development process.
You will explore these use cases in a moment.
What is the difference between transfer learning and fine-tuning?
Fine-tuning is an optional step in transfer learning. Fine-tuning will usually improve the performance of the model. However, since you have to retrain the entire model, you’ll likely overfit.
Overfitting is avoidable. Just retrain the model or part of it using a low learning rate. This is important because it prevents significant updates to the gradient. These updates result in poor performance. Using a callback to stop the training process when the model has stopped improving is also helpful.
Why use transfer learning?
Assuming you have 100 images of cats and 100 dogs and want to build a model to classify the images. How would you train a model using this small dataset? You can train your model from scratch, but it will most likely overfit horribly. Enter transfer learning. Generally speaking, there are two big reasons why you want to use transfer learning:
- training models with high accuracy requires a lot of data. For example, the ImageNet dataset contains over 1 million images. In the real world, you are unlikely to have such a large dataset.
- assuming that you had that kind of dataset, you might still not have the resources required to train a model on such a large dataset. Hence transfer learning makes a lot of sense if you don’t have the compute resources needed to train models on huge datasets.
- even if you had the compute resources at your disposal, you still have to wait for days or weeks to train such a model. Therefore using a pre-trained model will save you precious time.
When does transfer learning not work?
Transfer learning will not work when the high-level features learned by the bottom layers are not sufficient to differentiate the classes in your problem. For example, a pre-trained model may be very good at identifying a door but not whether a door is closed or open. In this case, you can use the low-level features (of the pre-trained network) instead of the high-level features. In this case, you will have to retrain more layers of the model or use features from earlier layers.
When datasets are not similar, features transfer poorly. This paper investigates the similarity of datasets in more detail. That said, as shown in the paper, initializing the network with pre-trained weights results in better performance than using random weights.
You might find yourself in a situation where you consider the removal of some layers from the pre-trained model. Transfer learning is unlikely to work in such an event. This is because removing layers reduces the number of trainable parameters, which can result in overfitting. Furthermore, determining the correct number of layers to remove without overfitting is a cumbersome and time-consuming process.


How to implement transfer learning?
Let’s now take a moment and look at how you can implement transfer learning.
Transfer learning in 6 steps
You can implement transfer learning in these six general steps.


Obtain the pre-trained model
The first step is to get the pre-trained model that you would like to use for your problem. The various sources of pre-trained models are covered in a separate section.
Create a base model
Usually, the first step is to instantiate the base model using one of the architectures such as ResNet or Xception. You can also optionally download the pre-trained weights. If you don’t download the weights, you will have to use the architecture to train your model from scratch. Recall that the base model will usually have more units in the final output layer than you require. When creating the base model, you, therefore, have to remove the final output layer. Later on, you will add a final output layer that is compatible with your problem.

Freeze layers so they don’t change during training
Freezing the layers from the pre-trained model is vital. This is because you don’t want the weights in those layers to be re-initialized. If they are, then you will lose all the learning that has already taken place. This will be no different from training the model from scratch.
base_model.trainable = False

Add new trainable layers
The next step is to add new trainable layers that will turn old features into predictions on the new dataset. This is important because the pre-trained model is loaded without the final output layer.

Train the new layers on the dataset
Remember that the pre-trained model’s final output will most likely be different from the output that you want for your model. For example, pre-trained models trained on the ImageNet dataset will output 1000 classes. However, your model might just have two classes. In this case, you have to train the model with a new output layer in place.
Therefore, you will add some new dense layers as you please, but most importantly, a final dense layer with units corresponding to the number of outputs expected by your model.
Improve the model via fine-tuning
Once you have done the previous step, you will have a model that can make predictions on your dataset. Optionally, you can improve its performance through fine-tuning. Fine-tuning is done by unfreezing the base model or part of it and training the entire model again on the whole dataset at a very low learning rate. The low learning rate will increase the performance of the model on the new dataset while preventing overfitting.
The learning rate has to be low because the model is quite large while the dataset is small. This is a recipe for overfitting, hence the low learning rate. Recompile the model once you have made these changes so that they can take effect. This is because the behavior of a model is frozen whenever you call the compile function. That means that you have to call the compile function again whenever you want to change the model’s behavior. The next step will be to train the model again while monitoring it via callbacks to ensure it does not overfit.

Pretty straightforward, eh?
Where to find pre-trained models?
Let’s now talk about where you can find pre-trained models to use in your applications.
Keras pre-trained models
There are more than two dozen pre-trained models available from Keras. They’re served via Keras applications. You get pre-trained weights alongside each model. When you download a model, the weights are downloaded automatically. They will be stored in `~/.keras/models/.` All the Keras applications are used for image tasks. For instance, here is how you can initialize the MobileNet architecture trained on ImageNet.
model = tf.keras.applications.MobileNet(
    input_shape=None,
    alpha=1.0,
    depth_multiplier=1,
    dropout=0.001,
    include_top=True,
    weights="imagenet",
    input_tensor=None,
    pooling=None,
    classes=1000,
    classifier_activation="softmax",
)
Transfer learning using TensorFlow Hub
It’s worth mentioning that Keras applications are not your only option for transfer learning tasks. You can also use models from TensorFlow Hub.
model = tf.keras.Sequential([
 hub.KerasLayer("https://tfhub.dev/google/imagenet/mobilenet_v2_100_224/feature_vector/4",
                   trainable=False),
    tf.keras.layers.Dense(num_classes, activation='softmax')
])
Related
See how you can track Keras model traning with Neptune’s integration with TensorFlow/Keras
Pretrained word embeddings
Word embeddings are usually used for text classification problems. In as much as you can train your word embeddings, using a pre-trained one is much quicker. Here are a couple of word embeddings that you can consider for your natural language processing problems:
- GloVe(Global Vectors for Word Representation) by Stanford
- Google’s Word2vec trained on around 1000 billion words from Google News
- Fasttext English vectors
READ ALSO
Training, Visualizing, and Understanding Word Embeddings: Deep Dive Into Custom Datasets
Hugging face
Hugging Face provides thousands of pre-trained models for performing tasks on texts. Some of the supported functions include:
- question answering
- summarization
- translation and
- text generation, to mention a few
Over 100 languages are supported by Hugging face.
Here’s an example of how you can use Hugging face to classify negative and positive sentences.
from transformers import pipeline
classifier = pipeline('sentiment-analysis')
classifier('We are very happy to include pipeline into the transformers repository.')
[{'label': 'POSITIVE', 'score': 0.9978193640708923}]
How you can use pre-trained models
There are three ways to use a pre-trained model:
- prediction,
- feature extraction,
- fine-tuning.
Prediction
Here, you download the model and immediately use it to classify new images. Here is an example of ResNet50 used to classify ImageNet classes.
ImageNet is an extensive collection of images that have been used to train models, including ResNet50. There are over 1 million images and 1000 classes in this dataset.
from tensorflow.keras.applications.resnet50 import ResNet50
from tensorflow.keras.preprocessing import image
from tensorflow.keras.applications.resnet50 import preprocess_input, decode_predictions
import numpy as np
model = ResNet50(weights='imagenet')
img_path = 'elephant.jpg'
img = image.load_img(img_path, target_size=(224, 224))
x = image.img_to_array(img)
x = np.expand_dims(x, axis=0)
x = preprocess_input(x)
preds = model.predict(x)
# decode the results into a list of tuples (class, description, probability)
# (one such list for each sample in the batch)
print('Predicted:', decode_predictions(preds, top=3)[0])
# Predicted: [(u'n02504013', u'Indian_elephant', 0.82658225), (u'n01871265', u'tusker', 0.1122357), (u'n02504458', u'African_elephant', 0.061040461)]
Feature extraction
In this case, the output of the layer before the final layer is fed as input to a new model. The goal is to use the pre-trained model, or a part of it, to pre-process images and get essential features.
Then, you pass these features to a new classifier—no need to retrain the base model. The pre-trained convolutional neural network already has features that are important to the task at hand.

However, the pre-trained model’s final part doesn’t transfer over because it’s specific to its dataset. So, you have to build the last part of your model to fit your dataset.
In the natural language processing realm, pre-trained word embedding can be used for feature extraction. The word embeddings help to place words in their right position in a vector space. They provide relevant information to a model because they can contextualize words in a sentence. The main objective of word embeddings is semantic understanding and the relationship between words. As a result, these word embeddings are task agnostic for natural language problems.
Fine-tuning
When your new classifier is ready, you can use fine-tuning to improve its accuracy. To do this, you unfreeze the classifier, or part of it, and retrain it on new data with a low learning rate. Fine-tuning is critical if you want to make feature representations from the base model (obtained from the pre-trained model) more relevant to your specific task.
You can also use weights from the pre-trained model to initialize weights in a new model. The best choice here depends on your problem, and you might need to experiment a bit before you get it right.
Still, there is a standard workflow you can use to apply transfer learning.
Let’s check it out.
Example of transfer learning for images with Keras
With that background in place, let’s look at how you can use pre-trained models to solve image and text problems. Whereas there are many steps involved in training a model, the focus will be on those six steps specific to transfer learning.
CHECK LATER
Transfer learning with image data
In this illustration, let’s take a look at how you can use a pre-trained model to build and fine-tune an image classifier. Let’s assume that you are a pet lover and you would like to create a machine learning model to classify your favorite pets; cats and dogs. Unfortunately, you don’t have enough data to do this. Fortunately, you are familiar with Kaggle and can get a small dataset. With that in place, you can now select a pre-trained model to use. Once you have chosen your pre-trained model, you can start training the model with Keras. To illustrate, let’s use the Xception architecture, trained on the ImageNet dataset.
If you’re coding along, follow this section step-by-step to apply transfer learning properly.
Getting the dataset
I recommend using Google Colab because you get free GPU computing.
First, download the dataset into Colab’s virtual machine.
 !wget --no-check-certificate \
    https://storage.googleapis.com/mledu-datasets/cats_and_dogs_filtered.zip \
    -O /content/catsdogs.zip
After that, unzip the dataset and set the path to the training and validation set.
import os
import zipfile
with zipfile.ZipFile('catsdogs.zip', 'r') as zip_ref:
    zip_ref.extractall('/content/')
base_dir = '/content/cats_and_dogs_filtered/'
train_dir = os.path.join(base_dir, 'train')
validation_dir = os.path.join(base_dir, 'validation')
Loading the dataset from a directory
Let’s now load the images from their location. The `image_dataset_from_directory` function can be used because it can infer class labels.
The function will create a `tf.data.Dataset` from the directory. Note that for this to work, the directory structure should look like this:
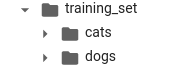
Import the required modules and load the training and validation set.
import tensorflow as tf
from tensorflow import keras
from tensorflow.keras.preprocessing import image_dataset_from_directory
training_set = image_dataset_from_directory(train_dir,
                                             shuffle=True,
                                             batch_size=32,
                                             image_size=(150, 150))
val_dataset = image_dataset_from_directory(validation_dir,
                                                  shuffle=True,
                                                  batch_size=32,
                                                  image_size=(150, 150))
Data pre-processing
Whereas data pre-processing isn’t a specific step in transfer learning, it is an important step in training machine learning models in general. Let’s, therefore, apply some augmentation to the images. When you apply augmentation to a training set, you’re preventing overfitting, because augmentation exposes different aspects of the image to the model.
You especially want to augment the data when there’s not a lot of data for training. You can augment it using various transformations, like:
- random rotations,
- horizontal flipping,
- zooming,
- shearing.
You can apply these transformations when loading the data. Alternatively, as you can see below, you can augment by introducing unique layers.
data_augmentation = keras.Sequential(
    [       keras.layers.experimental.preprocessing.RandomFlip("horizontal"),
   keras.layers.experimental.preprocessing.RandomRotation(0.1),
    ]
)
These layers will only be applied during the training process.
You can see the result of the above transformations by applying the layers to the same image. Here’s the code:
import numpy as np
import matplotlib.pyplot as plt
for images, labels in training_set.take(1):
    plt.figure(figsize=(12, 12))
    first_image = images[0]
    for i in range(12):
        ax = plt.subplot(3, 4, i + 1)
        augmented_image = data_augmentation(
            tf.expand_dims(first_image, 0)
        )
        plt.imshow(augmented_image[0].numpy().astype("int32"))
        plt.axis("off")
And here’s how the result would look like (since the images are shuffled, you might get a different result):

Create a base model from the pre-trained Xception model
Let’s load the model with the weights trained on ImageNet. When that’s done, the desired input shape is defined.
`include_top=False` means that you’re not interested in the last layer of the model. Since models are visualized from bottom to top, that layer is referred to as the top layer. Excluding the top layers is important for feature extraction.
base_model = keras.applications.Xception(
    weights='imagenet',
    input_shape=(150, 150, 3),
    include_top=False)
Next, freeze the base model layers so that they’re not updated during the training process.
Since many pre-trained models have a `tf.keras.layers.BatchNormalization` layer, it’s important to freeze those layers. Otherwise, the layer mean and variance will be updated, which will destroy what the model has already learned. Let’s freeze all the layers in this case.
base_model.trainable = False
Create the final dense layer
When loading the model, you used `include_top=False` meaning that the final dense layer of the pre-trained model wasn’t included. Now it’s time to define a final output layer for this model.
Let’s start by standardizing the size of the input images.
inputs = keras.Input(shape=(150, 150, 3))
After this, apply the data augmentation.
x = data_augmentation(inputs)
This model expects data in the range of (-1,1) and not (0,1). So, you have to process the data.
Luckily, most pre-trained models provide a function for doing that.
x = tf.keras.applications.xception.preprocess_input(x)
Let’s now define the model as follows:
- ensure that the base model is running in inference mode so that batch normalization layers are not updated during the fine-tuning stage (set `training=False`);
- convert features from the base model to vectors, using `GlobalAveragePooling2D`;
- apply dropout regularization;
- add a final dense layer (when you used `include_top=False,` the final output layer was not included, so you have to define your own).
x = base_model(x, training=False)
x = keras.layers.GlobalAveragePooling2D()(x)
x = keras.layers.Dropout(0.2)(x)
outputs = keras.layers.Dense(1)(x)
model = keras.Model(inputs, outputs)
Train the model
You can now train the top layer. Notice that since you’re using a pretrained model, validation accuracy starts at an already high value.

model.compile(optimizer='adam', loss=tf.keras.losses.BinaryCrossentropy(from_logits=True),metrics=keras.metrics.BinaryAccuracy())
model.fit(training_set, epochs=20, validation_data=val_dataset)
Fine-tuning the model
The model can be improved by unfreezing the base model, and retraining it on a very low learning rate.
You need to monitor this step because the wrong implementation can lead to overfitting. First, unfreeze the base model.
base_model.trainable = True
After updating the trainable attribute, the model has to be compiled again to implement the change.
model.compile(optimizer=keras.optimizers.Adam(1e-5),
              loss=keras.losses.BinaryCrossentropy(from_logits=True),
              metrics=keras.metrics.BinaryAccuracy())
To prevent overfitting, let’s monitor training loss via a callback. Keras will stop training when the model doesn’t improve for five consecutive epochs. Let’s also use TensorBoard to monitor loss and accuracy.
READ ALSO
How to Make Your TensorBoard Projects Easy to Share and Collaborate On
Deep Dive Into TensorBoard: Tutorial With Examples
from tensorflow.keras.callbacks import EarlyStopping, TensorBoard
rm -rf logs
%load_ext tensorboard
log_folder = 'logs'
callbacks = [
            EarlyStopping(patience = 5),
            TensorBoard(log_dir=log_folder)
            ]
OK, time to retrain the model. When it’s finished, you’ll notice a slight improvement from the previous model.
model.fit(training_set, epochs=15,validation_data=val_dataset,callbacks=callbacks)
At this point, you have a working model for the cats and dogs classification dataset.
If you were tracking this using an experimentation platform, you can now save the model and send it to your model registry.
Example of transfer learning with natural language processing
In the natural language processing realm, you can use pre-trained word embeddings to solve text classification problems. Let’s take an example.
Pretrained word embeddings
A word embedding is a dense vector that represents a document. In the vector, words with similar meanings appear closer together. You can use the embedding layer in Keras to learn the word embeddings. Training word embeddings takes a lot of time, especially on large datasets, so let’s use word embeddings that have already been trained.
A couple of popular pre-trained word embeddings are Word2vec and GloVe.

Let’s walk through a complete example using GloVe word embeddings in transfer learning.
Loading the dataset
A sentiment analysis dataset will be used for this illustration. Before loading it, let’s import all the modules that are needed for this task.
import tensorflow as tf
from tensorflow.keras.preprocessing.text import Tokenizer
from tensorflow.keras.preprocessing.sequence import pad_sequences
from tensorflow.keras.layers import Embedding, LSTM, Dense, Bidirectional
from tensorflow.keras.models import Sequential
import numpy as np
import pandas as pd
Next, download the dataset and load it in using Pandas.
!wget --no-check-certificate
    https://drive.google.com/uc?id=13ySLC_ue6Umt9RJYSeM2t-V0kCv-4C-P -O /tmp/sentiment.csv
    -O /tmp/sentiment.csv
df = pd.read_csv('/tmp/sentiment.csv')

The goal is to predict the sentiment column above. Since this is text data, it has to be converted into numerical form because that’s what the deep learning model expects.
Select the features, and the target then split the data into a training and testing set.
X = df['text']
y = df['sentiment']
from sklearn.model_selection import train_test_split
X_train, X_test , y_train, y_test = train_test_split(X, y , test_size = 0.20)
Data Pre-processing
Since this is text data, it has to be processed to make it ready for the models. This is not specific to transfer learning in text classification, but to machine learning models in general.
Tokenizing the words
To convert sentences into numerical representations, use `Tokenizer`. Tokenizer removes punctuation marks and special characters and converts the sentence to lowercase.
Just create an instance of `tokenizer` and fit it to the training set. You have to define the size of vocabulary you want. An out-of-word token is also defined to represent words in the testing set that won’t be found in the vocabulary.
vocab_size = 10000
oov_token = "<OOV>"
tokenizer = Tokenizer(num_words = vocab_size, oov_token=oov_token)
tokenizer.fit_on_texts(X_train)
You can use the word index to see how words are mapped to numbers.
word_index = tokenizer.word_index

Let’s convert the words to sequences so that a complete sequence of numbers can represent every sentence. This is done using `texts_to_sequences` from the tokenizer.
X_train_sequences = tokenizer.texts_to_sequences(X_train)

Since the sentences have different lengths, the sequences will also have different lengths. But, the sequences need to have an equal length for the machine learning model. This can be achieved by truncating longer sentences and padding shorter ones with zeros.
Using `post` for padding will add the zeros at the end of the sequences. `post` for the truncation type will truncate sentences longer than 100 at the end.
padding_type='post'
truncation_type='post'
max_length = 100

Using GloVe Embeddings
Now, this is specific to transfer learning in natural language processing. First, let’s download the pre-trained word embeddings.
!wget --no-check-certificate
    http://nlp.stanford.edu/data/glove.6B.zip
    -O /tmp/glove.6B.zip
Next, extract them into a temporary folder.
with zipfile.ZipFile('/tmp/glove.6B.zip', 'r') as zip_ref:
    zip_ref.extractall('/tmp/glove')
Now, use these word embeddings to create your own embedding layer. Load the Glove embeddings, and append them to a dictionary.
embeddings_index = {}
f = open('/tmp/glove/glove.6B.100d.txt')
for line in f:
    values = line.split()
    word = values[0]
    coefs = np.asarray(values[1:], dtype='float32')
    embeddings_index[word] = coefs
f.close()

print('Found %s word vectors.' % len(embeddings_index))
Use this dictionary to create an embedding matrix for each word in the training set. To do this, get the embedding vector for each word using `embedding_index`.
embedding_matrix = np.zeros((len(word_index) + 1, max_length))
for word, i in word_index.items():
    embedding_vector = embeddings_index.get(word)
    if embedding_vector is not None:
        # words not found in embedding index will be all-zeros.
        embedding_matrix[i] = embedding_vector
In case a word isn’t found, zero will represent it. For example, here is the embedding vector for the word bakery.
embeddings_index.get("bakery")

Create the embedding layer
At this point, you can create the embedding layer. Here are a couple of things to note:
- setting `trainable` to false is crucial because you want to make sure that this layer isn’t re-trained;
- weights are set to the embedding matrix you just created;
- `len(word_index) + 1` is the size of the vocabulary with one added because zero is reserved for padding;
- `input_length` is the length of input sequences.
embedding_layer = Embedding(len(word_index) + 1,
                            max_length,
                            weights=[embedding_matrix],
                            input_length=max_length,
                            trainable=False)
Create the model
You can now create the model using this embedding layer. Bidirectional LSTMs are used to ensure that information is passed backward and forward.
model = Sequential([
    embedding_layer,
    Bidirectional(LSTM(150, return_sequences=True)),
    Bidirectional(LSTM(150)),
    Dense(6, activation='relu'),
   Dense(1, activation='sigmoid')
])
Training the model
You can now compile and train the model.
model.compile(loss='binary_crossentropy',optimizer='adam',metrics=['accuracy'])
The early stopping callback can be used to stop the training process when the model training stops improving. You can monitor model loss and accuracy using the TensorBoard callback.
from tensorflow.keras.callbacks import EarlyStopping, TensorBoard
%load_ext tensorboard
rm -rf logs
log_folder = 'logs'
callbacks = [
            EarlyStopping(patience = 10),
            TensorBoard(log_dir=log_folder)
            ]
num_epochs = 600
history = model.fit(X_train_padded, y_train, epochs=num_epochs, validation_data=(X_test_padded, y_test),callbacks=callbacks)
The performance of the model can be e using the `evaluate` function.
loss, accuracy = model.evaluate(X_test_padded,y_test)
print('Test accuracy :', accuracy)
Nice! You have trained and tested a natural language processing model using pre-trained word embeddings.
That’s all, folks!
In this article, you explored transfer learning, with examples of how to use it to develop models faster. You used pre-trained models in image classification and natural language processing tasks. I hope you enjoyed it, thank you for reading!
If you want to read more about Transfer Learning feel free to check other sources:
- https://keras.io/guides/transfer_learning/
- https://builtin.com/data-science/transfer-learning
- https://towardsdatascience.com/a-comprehensive-hands-on-guide-to-transfer-learning-with-real-world-applications-in-deep-learning-212bf3b2f27a
- https://www.tensorflow.org/tutorials/images/transfer_learning
- https://machinelearningmastery.com/transfer-learning-for-deep-learning/
- https://machinelearningmastery.com/how-to-use-transfer-learning-when-developing-convolutional-neural-network-models/
- https://towardsdatascience.com/transfer-learning-from-pre-trained-models-f2393f124751
- https://www.researchgate.net/post/What-is-the-difference-between-Transfer-Learning-vs-Fine-Tuning-vs-Learning-from-scratch
- https://arxiv.org/pdf/1411.1792.pdf
