
Object detection is a computer vision task that has recently been influenced by the progress made in Machine Learning.
In the past, creating a custom object detector looked like a time-consuming and challenging task. Now, with tools like TensorFlow Object Detection API, we can create reliable models quickly and with ease.

In this article we will focus on the second generation of the TensorFlow Object Detection API, which:
- supports TensorFlow 2,
- lets you employ state of the art model architectures for object detection,
- gives you a simple way to configure models.
If you’re interested to know all of the features available in TensorFlow 2 and its API, you can find them in the official announcement from Google.
After reading this article, you should be able to create your own custom object detector.
We’ll be using the EfficientDet based model as an example, but you will also learn how to use any architecture of your choice to get a model up and running. Stay tuned! Your own object detector is just around the corner.

Before you start
Let me briefly talk about the prerequisites that are essential to proceed towards your own object detector:
- You should have Python installed on your computer. In case you need to install it, I recommend following this official guide by Anaconda.
- If your computer has a CUDA-enabled GPU (a GPU made by NVIDIA), then a few relevant libraries are needed in order to support GPU-based training. In case you need to enable GPU support, check the guidelines on NVIDIA’s website. Your goal is to install the latest version of both the CUDA Toolkit, and cuDNN for your operating system.
Installation and setup
Let’s first make sure that we have everything needed to start working with the TensorFlow Object Detection API. I’ll go over the entire setup process, and explain every step to get things working.
If you’ve already worked with the TF API, you can still have a quick glance over this part, just to make sure that we’re following the same direction.
But if it is your first time installing Tensorflow Object detection API, I would highly recommend completing all of the steps in this section. Let’s jump in!
1. Creating a project directory
Under a path of your choice, create a new folder. Name it Tensorflow.
2. Creating a new virtual environment
- Open a Terminal window and use the
cdcommand to navigate to theTensorflowfolder created in step 1.
- Create a new virtual environment using the
venvlibrary:
If you already have venv installed on your machine (or you prefer managing environments with another tool like Anaconda), then proceed directly to new environment creation.
In case you don’t know what venv is or don’t have it installed, you can do it by typing the following command in your Terminal window:
pip install venv
In order to create a new environment using venv, type the following command in your Terminal window:
python -m venv tf2_api_env
Once executed, a new virtual environment named tf2_api_env will be created by venv.
- Activate newly created virtual environment:
In order to activate the virtual environment that we’ve just created, you first need to make sure that your current working directory is Tensorflow. You can check your current working directory by typing and executing the following command in your Terminal window:
pwd
In order to activate your virtual environment, run the following command from you Terminal window:
source tf2_api_env/bin/activate
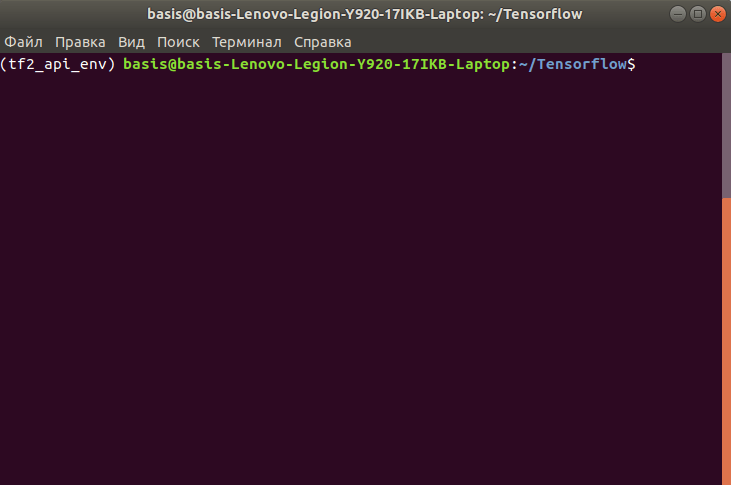
If you see the name of your environment at the beginning of the command line within your Terminal window, then you are all set. It should look like this:
- Install core library
It’s time to install TensorFlow in our environment. Make sure that your environment is activated, and do the installation by executing the following command:
pip install tensorflow==2.*
NOTE: as I’m writing this article, the latest TensorFlow version is 2.3. You can use this version, but it’s not a requirement. Everything we do in this guide is compatible with 2.3, and it might also work with later updates. It’s up to you to try. In case of any problems, you can always downgrade to 2.3 and move on.
3. Download and extract TensorFlow Model Garden
Model Garden is an official TensorFlow repository on github.com. In this step we want to clone this repo to our local machine.
- Make sure that within your Terminal window you’re located in the
Tensorflowdirectory.
- In your web browser, go to Model Garden Repo and click on the Code button in order to select a cloning method that’s best for you (the options are HTTPS, SSH or GitHub CLI).

- Once you select the cloning method, clone the repo to your local
Tensorflowdirectory. In case you need extra help with cloning, check this official GitHub guide.
By now you should have the following structure under the Tensorflow directory:
Tensorflow/
└─ tf2_api_env/
   ├─ bin/
   ├─ include/
   └── …
└─ models/
   ├─ community/
   ├─ official/
   ├─ orbit/
   └── …
4. Download, install and compile Protobuf
By default, the TensorFlow Object Detection API uses Protobuf to configure model and training parameters, so we need this library to move on.
- Go to the official protoc release page and download an archive for the latest protobuf version compatible with your operation system and processor architecture.
For example, I’m using Ubuntu. My CPU is AMD64 (64-bit processor). As I’m writing this article, the latest protoc version is 3.13.0. Given all of that information, I am downloading protoc-3.13.0-linux-x86_64.zip file from the official protoc release page.
- In the
Tensorflowproject directory, create a new folder calledprotoc. Extract the content of the downloaded archive to theTensorflow/protocdirectory.
Now your Tensorflow directory structure should look like this:
Tensorflow/
└─ protoc/
   ├─ bin/
   ├─ include/
   ├─ readme.txt
└─ tf2_api_env/
   ├─ bin/
   ├─ include/
   └── …
└─ models/
   ├─ community/
   ├─ official/
   ├─ orbit/
   └── …
- Compile all proto files
Make sure that in your Terminal window, you’re located in the Tensorflow directory. To compile proto files, execute this command:
protoc/bin/protoc models/research/object_detection/protos/*.proto
--python_out=.
5. Install COCO API
COCO API is a dependency that does not go directly with the Object Detection API. You should install it separately. Manual installation of COCO API introduces a few new features (e.g. set of popular detection or/and segmentation metrics becomes available for model evaluation). Installation goes as follows:
If you’re using Windows:
- Make sure that within your Terminal window you’re located in the
Tensorflowdirectory. Run the following commands one by one:
pip install cython
pip install git+https://github.com/philferriere/cocoapi.git
If you’re using Linux:
- Make sure that within your Terminal window you’re located in the
Tensorflowdirectory. Run the following commands one by one:
pip install cython
git clone https://github.com/cocodataset/cocoapi.git
cd cocoapi/PythonAPI
make
cp -r pycocotools ./models/research/
By the end of this step, your Tensorflow directory structure should look like this:
Tensorflow/
└─ cocoapi/
   ├─ common/
   ├─ LuaAPI/
   └── …
└─ protoc/
   ├─ bin/
   ├─ include/
   ├─ readme.txt
└─ tf2_api_env/
   ├─ bin/
   ├─ include/
   └── …
└─ models/
   ├─ community/
   ├─ official/
   ├─ orbit/
   └── …
6. Object Detection API installation
This is the final step of our Installation and Setup block! We’re going to install the Object Detection API itself. You do this by installing the object_detection package. Here’s how:
- Make sure that within your Terminal window you’re located in the
Tensorflowdirectory.
- Change the current working directory from
TensorflowtoTensorflow/models/researchusing thecdcommand
- Run the following commands one by one in your Terminal window:
cp object_detection/packages/tf2/setup.py .
python -m pip install .
NOTE: the second command might give you an error. No worries at all. Just run it one more time until you see a completed installation.
- Test if your installation is successful by running the following command from
Tensorflow/models/researchdirectory in your Terminal window:
python object_detection/builders/model_builder_tf2_test.py
Once tests are finished, you will see a message printed out in your Terminal window. If all 20 tests were run and the status for them is “OK” (some might be skipped, that’s perfectly fine), then you are all set with the installation!

That was a lot of work, so congratulations! Well done!
Data preparation
When you finish all installation steps, you need to think about the data that you’ll feed into your custom object detection model later.
Models based on the TensorFlow object detection API need a special format for all input data, called TFRecord. We’ll talk about how to transform your data into the TFRecord format (to get a better sense of what the TFRecord format is, I highly recommend reading this article), but first let’s talk about a few assumptions about your data availability and its annotations. Specifically, we assume that:
- You already have data (images) collected for model training, validation and testing,
- Your images are annotated for object detection, meaning that regions for all objects of interest that might be presented in your datasets are manually defined as bounding boxes, and ground truth labels are set for each and every box.
If these assumptions are wrong for you, you won’t be able to proceed towards your object detection creation. It’s simple: no data – no model.
The good news is that there are many public image datasets. I highly recommend spending some time searching for a dataset that you’re interested in. There’s a big chance that you’ll find something that’s worth your time.
If you need annotation, there are tons of solutions available. Pick the one that you like. They’ll all give you annotations either in JSON or XML. Both are suitable for our purposes.
I won’t spend much time on image collection and annotation here – I hope that you’ll be able to solve this on your own, so we can proceed to the next important step: data transformation.
Data transformation
I mentioned that you need the TFRecord format for your input data. Your goal at this step is to transform each of your datasets (training, validation and testing) into the TFRecord format.
In order to ensure comparability, let’s create a subfolder called workspace within your Tensorflow directory. We will use the workspace folder to store all of the model-related attributes, including data.
To store all of the data, let’s create a separate folder called data in Tensorflow/workspace. All transformed datasets that we will get by the end will be placed in Tensorflow/workspace/data.
By the end of this step your Tensorflow directory will look like this:
Tensorflow/
└─ cocoapi/
└─ protoc/
└─ tf2_api_env/
└─ models/
└─ workspace/
   └─ data/
      ├─ train.record
      ├─ validation.record
      ├─ test.record
Now back to data transformation. Most of the annotation files created using popular image annotation tools come in one of the two formats: JSON or XML.
Figure out what format of annotations you have for your data. You’ll need it to select a proper tool for transforming to TFRecord.
Option #1: your annotation comes in JSON format. My recommendation is to:
- First transform JSONs to XML by using, for example, this python script (credit to Kentaro Wada),
- Transform from XML to TFRecord. I found this script to be useful for such transformation (credit to TensorFlow Object Detection Maintainers).
Option #2: your annotation comes in a format similar to what popular datasets like COCO, Kitti or Pascal have (note: Pascal annotations come in XML that we already know and previously worked with in Option #1). In this case I recommend you:
- Browse for a proper script for transforming your data format to TFRecord in this folder within the official TensorFlow Repo. It has a script for every popular format.
Label Map creation
A Label Map is a simple .txt file (.pbtxt to be exact). It links labels to some integer values. The TensorFlow Object Detection API needs this file for training and detection purposes.
In order to understand how to create this file, let’s look at a simple example where we want to detect only 2 classes: cars and bikes. Nothing else matters, just these two objects. Let’s look at how label_map.pbtxt will look like for such a task:

Now you know how to create your own label map. Pick a text editor (or an IDE) of your choice (I used atom), and create a label map file that reflects the number of classes that you’re going to detect with your future object detector. Give meaningful names to all classes so you can easily understand and distinguish them later on.
When you’re done, place your newly created label_map.pbtxt into the Tensorflow/workspace/data directory. Your Tensorflow/workspace/data directory by now should contain 4 files:
train.record,validation.record,test.record,label_map.pbtxt.
That’s all for data preparation! You’ve made another big step towards your object detector. The most essential (arguably) part of every machine learning project is done. You have your data, and it’s ready to be fed into your model.

Next, we will move on to model architecture selection and configuration. Keep going!
Model selection and configuration
In this part of the tutorial we want to do two things:
- First, select a model architecture to work with. Luckily, there are plenty of options and all of them are awesome.
- Second, we will work on model configuration, so it can tackle a desired task, be efficient, work under resource constraints that you might experience, and have the ability to generalise well enough to be used in the real world.
This is one of my favourite parts, because this is where Machine Learning begins! Let’s get started!
Model selection
One of the coolest features of the TensorFlow Object Detection API is the opportunity to work with a set of state of the art models, pre-trained on the COCO dataset! We can fine-tune these models for our purposes and get great results.

Now, you need to choose and download the model:
- Go to the TF 2 Detection Model Zoo page and select the model that you are going to work with.
- Click on the model name that you’ve chosen to start downloading.
- Within the
Tensorflow/workspace/directory, create a new folder calledpre_trained_modelsand extract your downloaded model into this newly created directory.
- In case you’d like to train multiple models with different architectures and later compare their performance to select a winning one (sounds like a nice idea to me!), you should download these models now and unpack all of them to
pre_trained_modelsdirectory.
By now your project directory should look like this:
Tensorflow/
└─ cocoapi/
└─ protoc/
└─ tf2_api_env/
└─ models/
└─ workspace/
   └─ data/
   └─ pre_trained_models/
      ├─ <folder with the 1st model of your choice>
      ├─ <folder with the 2nd model of your choice>
      ├─ …
      ├─ <folder with the N model of your choice>
Intro to model configuration
We downloaded and extracted a pre-trained model of our choice. Now we want to configure it. There might be multiple reasons why we want to do that. Let me give you a few, so you can get a sense of why configuration is essential:
- Your problem domain and your dataset are different from the one that was used to train the original model: you need a custom object detector (probably why you are reading this article),
- You have a different number of objects classes to detect,
- The objects you try to detect might be completely different from what a pre-trained model was supposed to detect,
- You probably have less computational power to train a model, and this also should be taken into account.
So you see why you need to configure your model. The list of reasons goes on, but let’s move on. We’ll talk about it in detail a bit later, with a real-life example.
For now I want you to remember that model configuration is a process that lets us tailor model-related artifacts (e.g. hyperparameters, loss function, etc) so that it can be trained (fine-tuned) to tackle detection for the objects that we’re interested in. That’s it.
The TensorFlow Object Detection API allows model configuration via the pipeline.config file that goes along with the pre-trained model.
Project directory organisation
Before diving into model configuration, let’s first organise our project directory. This is an important step that helps us keep our overall project structure neat and understandable.

We now want to create another directory that will be used to store files that relate to different model architectures and their configurations.
You might ask:
“Wait, Anton, we already have pre_trained_models folder for model architectures! Why on earth don’t we use it?”
That’s a fair point, but my personal experience led me to a different, way cleaner, solution. Believe me, you’ll love it at the end! Here is what you need to do:
- Go to
Tensorflow/workspaceand create a new directory calledmodels.
- Within
Tensorflow/workspace/models, create another directory with a name that corresponds to the model architectures you decided to work with (those models you downloaded toTensorflow/workspace/pre_trained_models).
For example, I wanted to train an object detector based on EfficientDet architecture. I noted that there are multiple EfficientDets available at TF 2 Detection Model Zoo page, which have different depths (from D0 to D7, more on that can be found here).
I thought that I’d first go with the most basic one, which is EfficientDet D0 512×512, but later also try EfficientDet D1 640×640, which is deeper and might get better performance. So, in my case I need to create two folders: efficientdet_d0 and efficiendet_d1.
Directory name selection is up to you. What’s important is to create a directory for every model architecture you want to work with, and to include the model architecture information in the name of the folder. That’s it.
By now your project directory structure should be similar to the following:
Tensorflow/
└─ ...
└─ workspace/
   └─ data/
   └─ pre_trained_models/
   └─ models/
      ├─ <folder with the 1st model of your choice>
      ├─ <folder with the 2nd model of your choice>
      ├─ …
      ├─ <folder with the N model of your choice>
- Go to the
Tensorflow/workspace/pre_trained_modelsand open a directory that contains the model that you want to configure
- Look for
pipeline.configfile in there. Copy this file to the corresponding folder within theTensorflow/workspace/models/<folder with the model of your choice>/v1/(you will need to createv1folder. I’ll explain later what it’s for).
- When copied, open
pipeline.configfile from theTensorflow/workspace/models/<folder with the model of your choice>/v1/using a text editor or an IDE of your choice. When opened, you should see something like this:

Now you’re ready to start working on model configuration! The next section will explain how to do that properly.
EDITOR’S NOTE
In addition to a proper folder and naming structure using an experiment tracking tool for organization can help keep things nice and clean.
Configuration process: the basics
I decided that the model configuration process should be split into two parts.
First, we’ll look at the basics. We’ll touch a minimum required set of parameters that should be configured in order to kick off the training and get a result…a baseline result.
With this approach, it’s super easy to kick things off, but you will sacrifice end-model performance. It will be fully workable, but not as good as it can be.
In the second step we’ll focus on tuning a broad range of available model parameters. I’ll give you a framework that you can use in order to tune every model parameter that you want.
You will have a lot of power over the model configuration, and be able to play around with different setups to test things out, and get your best model performance.
Sounds exciting? Yeah, it is! Let’s dive in.
Look at your pipeline.config file that you previously opened from Tensorflow/workspace/models/<folder with the model of your choice>/v1/. No matter what model you decided to work with, your basic configuration should touch the following model parameters:
num_classes(int). You must provide an exact number of classes that your model is going to detect. By default, it is equal to 90 because the pre-trained model is supposed to be used for 90 objects within the COCO dataset.

num_classes parameter. Example for EfficientDet D1
batch_size(int, must be divisible by 2). This value should be set depending on how much memory you have available. Keep in mind that the higher the batch size, the more memory your machine/GPU needs. If you don’t know which number to go with initially, I recommend starting withbatch_size= 8
NOTE: batch_size parameter should be set in two places within the pipeline.config file: in train_config and eval_config (see two images below)

batch_size parameter within the train_config. Example for EfficientDet D1

batch_size parameter within the eval_config. Example for EfficientDet D1
For eval_config you must go with 1. For train_confid use the logic I described above.
- fine_tune_checkpoint (str). Here is where you provide a path to the pre-trained model checkpoint.
As a kind reminder, the checkpoint you need is located in Tensorflow/workspace/pre_trained_models/<folder with the model of your choice>/checkpoint/ckpt-0.
Just replace <folder with the model of your choice> with the name of the folder where your pre-trained model is located.
fine_tune_checkpoint_type(str). This field should be set todetectionbecause we want to train a detection model.use_bfloat16(boolean). This field should be set tofalseif you’re not going to train a model on a TPU. Set totrueotherwise.label_map_path(str). Here is where you provide a path to thelabel_map.pbtxtyou created previously.
Another kind reminder: we placed label_map.pbtxt to Tensorflow/workspace/data directory.
NOTE: label_map_path parameter should be set in two places within the pipeline.config file: in train_input_reader and eval_input reader (see two images below)

label_map_path parameter within the train_input_reader. Example for EfficientDet D1

label_map_path parameter within the eval_input_reader. Example for EfficientDet D1
input_path(str). Here is where you provide a path to thetrain.recordandvalidation.recordyou created previously. As you might have already guessed, the path tovalidation.recordshould be set withineval_input_reader, whereas the path totrain.recordshould be set withintrain_input_reader.
My last kind reminder: we also placed all .record files in the Tensorflow/workspace/data directory.
We’ve just finished making a basic configuration that is required to start training your custom object detector. Was it hard? Hell no! Just multiple lines of changes and you’re ready to go.
You might have noticed that the pipeline.config file is much longer compared to the few lines we worked with in the basic configuration process. Is there more room for configuration? Absolutely yes! Let’s look at what else we can do in order to make our model more robust.
Configuration process: advanced
How to approach tuning other parameters in the config file?
Which values of parameters should I try?
Where and how can I read more about parameters and their meaning?

Those are the questions that I had at the very beginning of my work with the TensorFlow Object Detection API.
If you feel like it’s not clear for you as well, don’t worry! Luckily for us, there is a general approach that can be used for parameter tuning, which I found very convenient and easy to use.
Let me show you what it’s about in a real life example!
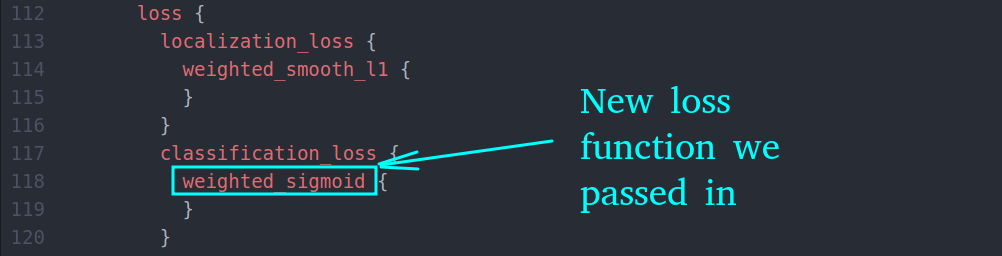
Let’s suppose you saw in the pipeline.config file that a default classification loss function (which is weighted_sigmoid_focal for EfficientDet D1. Defined as classification_loss parameter) is the one that you think is not optimal and you want to look for other available options.

Lines in pipeline.config where loss functions are defined. Example for EfficientDet D1
Here is how you’re going to look for other available options:
- Go to the official TensorFlow API GitHub page and find a search window at the top left of the page.

- Do the search given the following request pattern:
parameter_name path:research/object_detection/protos
As for our example, our parameter_name is classification_loss. You need to paste an exact name of the parameter from pipeline.config file. Given our example, your search request will be the following:
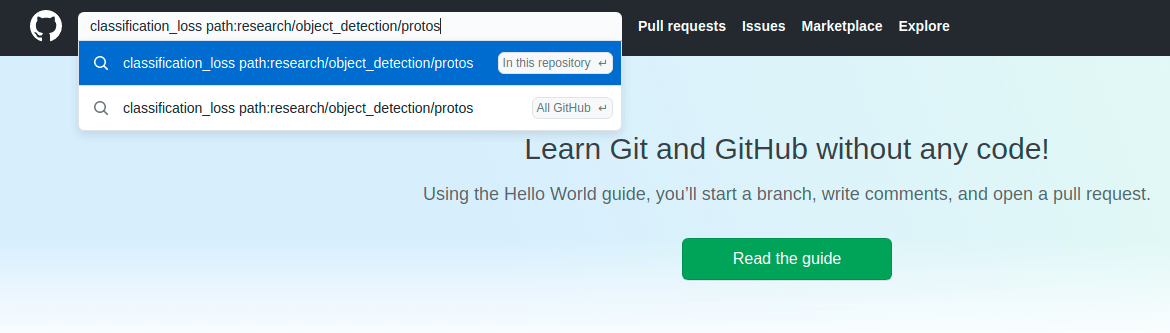
- Browse through the search results and look for the one that best describes our requested parameter (
classification_loss).

- Click on the link to a file that best describes your requested parameter (as we noted in the above image, our target file could be research/object_detection/protos/losses.proto) and wait for the page with the file to be loaded.
- When loaded, just use a regular browser search to find a line of code where our desired parameter (
classification_loss) is. When I did this, I found the following piece of code:

Here is what can be concluded from the above code snippet:
> classification_loss is a parameter that can be one of (oneof) the 6 predefined options listed on a image above
> Each option, its internal parameters and its application can be better understood via another search using same approach we did before.
- When you find a value for your parameter, just copy it to the corresponding line within your
pipeline.configfile. As an example, I decided to go withweighted_sigmoidloss for classification instead of the defaultweighted_sigmoid_focal. To do that, I made a change in mypipeline.configfile and now the line that defines classification loss looks like this:
This is it. You can employ this approach to tune every parameter of your choice. Now you have a superpower to customize your model in such a way that it does exactly what you want. Isn’t it awesome? It definitely is. Congratulations!

WANT TO READ MORE?
If you are interested in hyperparameter tuning we have a lot of great resources on our blog://r//n//r//n![]() ️ Hyperparameter Tuning in Python: a Complete Guide 2020
️ Hyperparameter Tuning in Python: a Complete Guide 2020
Model training
We’ve done a lot of work in order to get to this step. Now we are ready to kick things off and start training. Here is how to do that:
- You need to copy a provided python script for training from
Tensorflow/models/research/object_detection/model_main_tf2.pytoTensorflow/workspace/model_main_tf2.py
- Open a new Terminal window and make
Tensorflow/workspace/your current working directory.
- Launch the training job by using the following command:
python model_main_tf2.py
  --pipeline_config_path=<path to your config file>
  --model_dir=<path to a directory with your model>
  --checkpoint_every_n=<int for the number of steps per checkpoint>
  --num_workers=<int for the number of workers to use>
  --alsologtostderr
Where:
> <path to your config file> is a path to the config file you are going to use for the current training job. Should be a config file from ./models/<folder with the model of your choice>/v1/
> <path to a directory with your model> is a path to a directory where all of your future model attributes will be placed. Should also be the following: ./models/<folder with the model of your choice>/v1/
> <int for the number of steps per checkpoint> is an integer that defines how many steps should be completed in a sequence order to make a model checkpoint. Remember, that when a single step is made, your model processes a number of images equal to your batch_size defined for training.
> <int for the number of workers to use> if you have a multi-core CPU, this parameter defines the number of cores that can be used for the training job.
Right after you execute the above command, your training job will begin. It’s worth mentioning that if you’re going to train using a GPU, all of your GPUs will be involved. In case you want to involve only selected GPUs, execute the following command before launching a training job script:
export CUDA_VISIBLE_DEVICES= <GPUs>
Where <GPUs> defines GPUs to be used by their order number. For example, I have two GPUs. The first one has an order number of 0, the second one has 1. If I want to train a model on my 0th GPU, I execute the following command:
export CUDA_VISIBLE_DEVICES=0
If I want to train on both of my GPUs, I go with the following command:
export CUDA_VISIBLE_DEVICES=0,1
In case, I decided to train my model using only CPU, here is how my command is going to looks like:
export CUDA_VISIBLE_DEVICES=-1
Now, it’s time for you to lie down and relax. The rest of the work will be done by the computer!

Final thoughts
It’s been a long journey, hasn’t it? Now you have the knowledge and practical skills to import, customize and train any object detector you want.
The TensorFlow Object Detection API is a great tool for this, and I am glad that you are now fully equipped to use it. Let’s briefly recap what we’ve done:
- We started with an initial installation and setup that was needed to kick things off: we installed all dependencies, organized project directory, enabled GPU support.
- Then we proceeded to data preparation, learned about TFRecords and transformed our data to this format. We also linked classes with its names by utilizing Label Maps.
- Then we jumped into model selection and decided what model architecture we want to work with. Now we know that each and every model can be customized via a configuration file that we are familiar with.
- Lastly, we went straight to the training job and launched model training given the configuration we prepared.
Great job if you’ve done it till the end! I hope that you found this article interesting and useful.
In the upcoming second article, I will talk about even cooler things! In particular, we will answer the following questions:
- How to launch an evaluation job for your model and check its performance over time?
- What is the most convenient way to track results and compare your experiments with different model configurations?
- How to further improve model quality and its performance?
- How to overcome issues that could occur?
- How to export a trained model in order to use it for inference?
